Add database using automatic seeding
Introduction
During this lab, you will learn how to add a database to an existing availability group using automatic seeding.
Objectives
At the end of this lab, you will be able to:
- Apply the permissions required for automatic seeding
- Configure replicas to enable automatic seeding
- Add a database to an existing availability group
- Validate the secondary replicas have a copy of the new database
Estimated Time
20 minutes
Logon Information
Before Login make sure windows has Applied Computer Setting to all nodes.
Use the following credentials to login into virtual environment
Connect to AlwaysOnClient as Corpnet\Cluadmin using Pa$$w0rd as the password.
Click the Type Text icon to enter the associated text into the virtual machine.
Connect to AlwaysOnN1 as CORPNET\Administrator using Pa$$w0rd as the password.
Click the Type Text icon to enter the associated text into the virtual machine.
Connect to AlwaysOnN2 as CORPNET\Administrator using Pa$$w0rd as the password.
Click the Type Text icon to enter the associated text into the virtual machine.
Connect to AlwaysOnN3 as CORPNET\Administrator using Pa$$w0rd as the password.
Click the Type Text icon to enter the associated text into the virtual machine.
Connect to AlwaysOnDC as Administrator using Pa$$w0rd as the password.
Click the Type Text icon to enter the associated text into the virtual machine.
Change the screen resolution if required.
You may want to adjust the screen resolution to your own preference. Do this by right-clicking on the desktop and choosing Screen resolution and clicking OK when finished.
Screenshots in the lab instructions may appear with a lower SQL version number than is installed in the lab environment where functionality is not affected.
Exercise 1: Apply permissions required for automatic seeding
In this exercise, you will learn how to apply permissions required for automatic seeding
Tasks
Login to the AlwaysOnClient virtual machine as CORPNET\cluadmin using Pa$$w0rd.
Click the Type Text icon to enter the associated text into the virtual machine.
Open SQL Server Management studio (SSMS) and click Connect

In Registered servers, expand Database Engine, and then navigate down to Local Server Groups
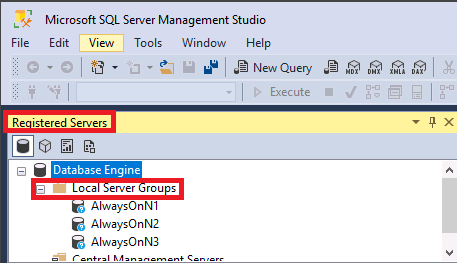
Right click Local Server Groups and select New Query.
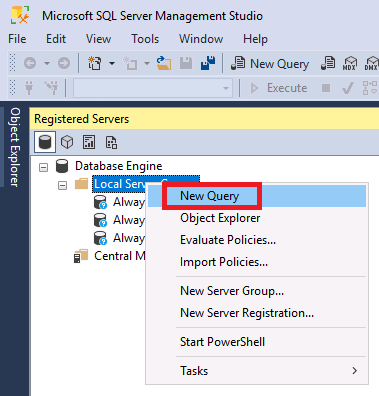
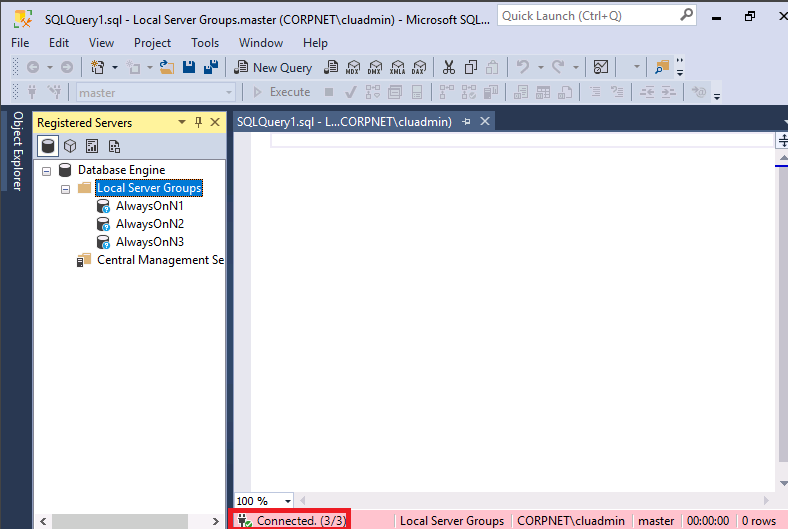
A new query window will appear.
Notice the pink status bar at the bottom that says Connected. (3/3). This means that whatever commands are issued in the query window, they will be executed to all three servers in the Local Server Groups list, namely: AlwaysOnN1, AlwaysOnN2, and AlwaysOnN3.
Type in the following TSQL, and press the F5 key to execute or press the Execute button. This will grant the Create Any Database permission to the availability group on all three replicas.
Open Notepad in the lab environment VM. Use the Type Text feature to enter the code into Notepad, copy the code, and then paste it into the Query Editor. This will bypass the autocomplete features in the Query Editor.
TSQLALTER AVAILABILITY GROUP [AGCorp]
 GRANT CREATE ANY DATABASE;
Look at the Messages output. It should say it completed successfully on (3 Servers)
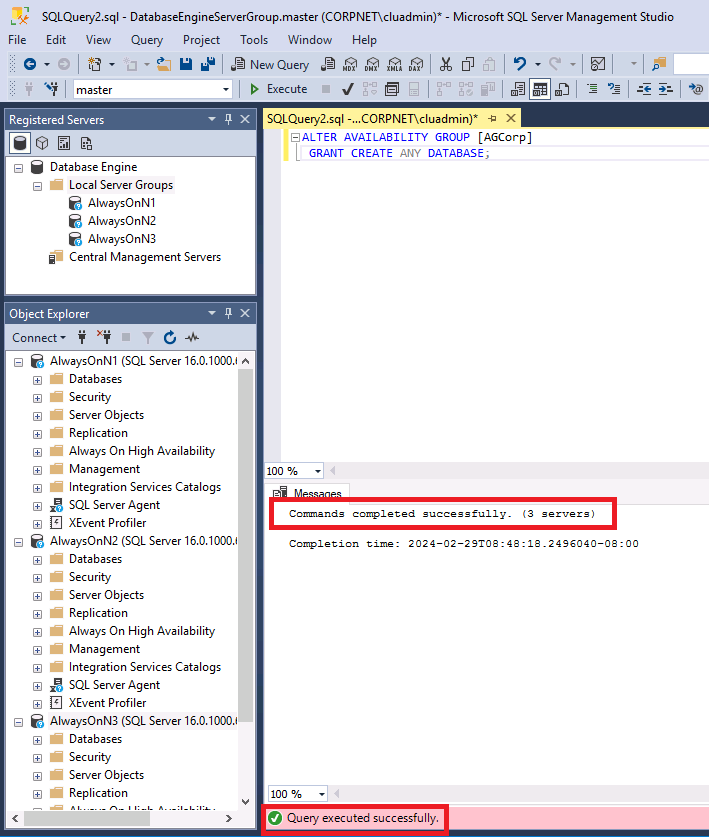
Next, close this query window by clicking the X as shown in the screen caption.
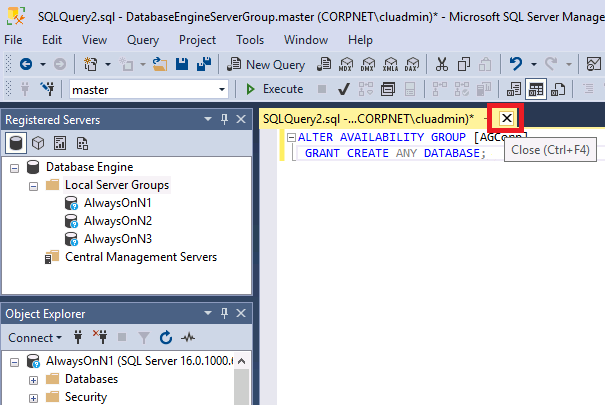
When prompted to save the query, click No.
Congratulations!
You have successfully completed this exercise. Click Next to advance to the next exercise.
Exercise 2: Configure replicas to enable automatic seeding
In this exercise, you will learn how to configure replicas to enable automatic seeding
Tasks
The next command needs to be executed on the primary replica of the availability group. It is not always clear which instance is the primary, so we will connect using the availability group listener, AGCorpList.
Click on the Connect button in the Object Explorer window as show in the screen caption. Select the Database Engine option.
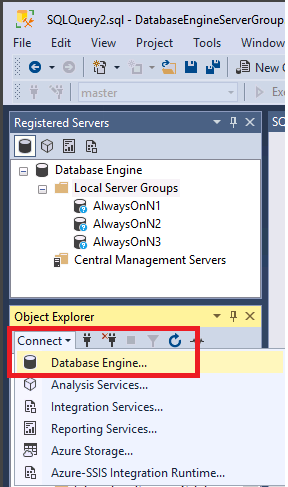
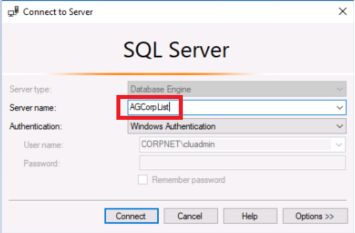
Enter the name of the availability group listener, AGCorpList and press the Connect button.
Find AGCorpList in the list of instances in the Object Explorer, right click it and select New Query
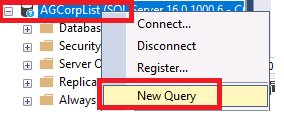
In the query window that appears, type the following TSQL and press F5 or click the Execute button to execute the script:
Open Notepad in the lab environment VM. Use the Type Text feature to enter the code into Notepad, copy the code, and then paste it into the Query Editor. This will bypass the autocomplete features in the Query Editor.
TSQLALTER AVAILABILITY GROUP [AGCorp] MODIFY REPLICA ON 'AlwaysOnN1' WITH (SEEDING_MODE = AUTOMATIC); GO ALTER AVAILABILITY GROUP [AGCorp] MODIFY REPLICA ON 'AlwaysOnN2' WITH (SEEDING_MODE = AUTOMATIC); GO ALTER AVAILABILITY GROUP [AGCorp] MODIFY REPLICA ON 'AlwaysOnN3' WITH (SEEDING_MODE = AUTOMATIC); GO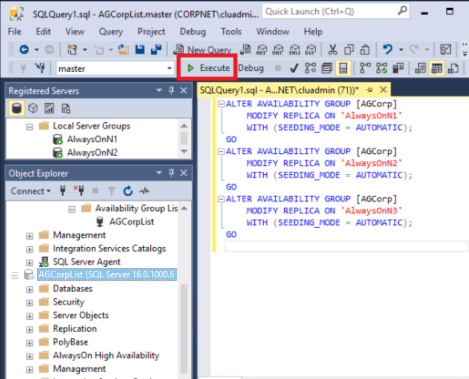
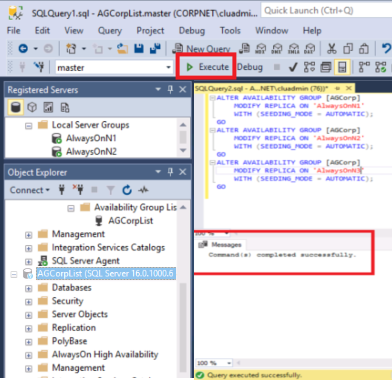
Verify the Messages tab indicated the commands completed successfully.
Congratulations!
You have successfully completed this exercise. Click Next to advance to the next exercise.
Exercise 3: Add a database to an existing availability group
In this exercise, you will learn how to add a database to an existing availability group
Tasks
Go to registered servers and navigate down to Local Server Groups
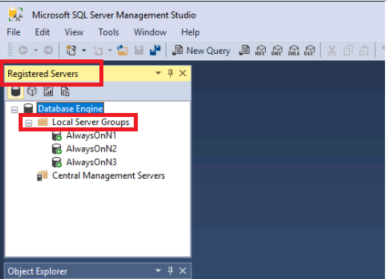
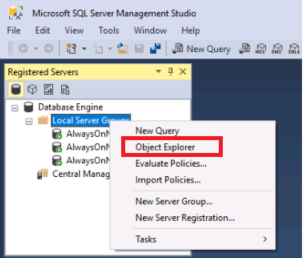
Right click Local Server Groups and select Object Explorer. This will connect to all the instances in the availability group.
For each instance in the Object Explorer, expand the instance, and then expand Databases. Verify that only AlwaysOnN1 contains the database CustomerData. The other two instances, AlwaysOnN2 and AlwaysOnN3, will only have two databases - AdventureWorks and AdventureWorksDW. In this exercise, we will add the database CustomerData to the existing availability group AGCorp.
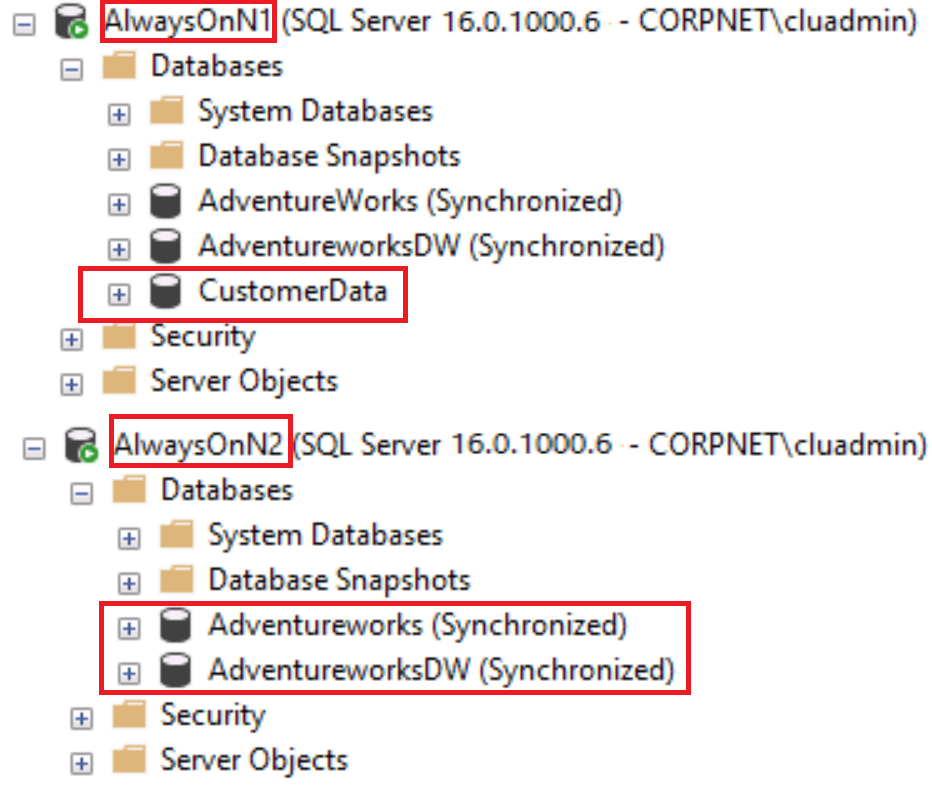
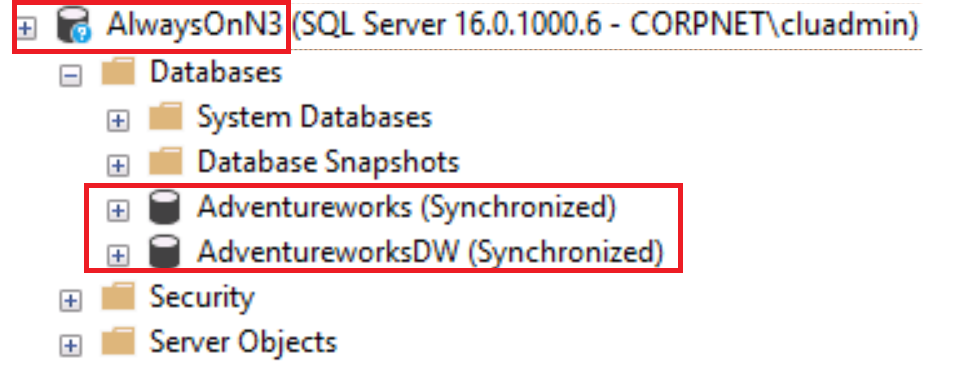
The next command needs to be executed on the primary replica of the availability group. It is not always clear which instance is the primary, so we will connect using the availability group listener, AGCorpList.
Click on the Connect button in the Object Explorer window as show in the screen caption. Select the Database Engine option.
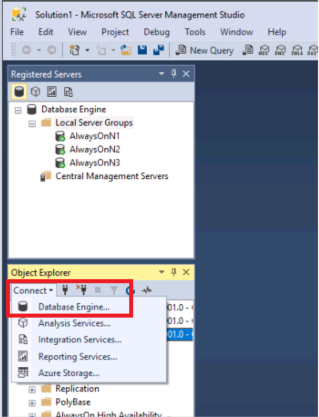
Enter the name of the availability group listener, AGCorpList and press the Connect button.

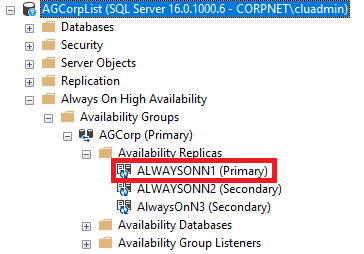
Expand AGCorpList > Always On High Availability > Availability Groups > AGCorp (Primary) > Availability Replicas to find the Primary and Secondary Replicas as shown below.
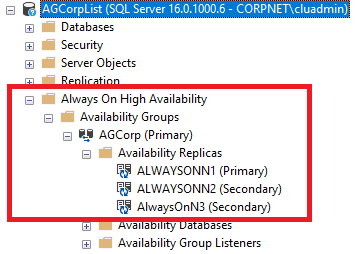
For this lab we need AlwaysOnN1 to be the primary replica as it has the CustomerData database. If AlwaysOnN1 is not the primary replica as shown in the above picture, then follow the below steps to make AlwaysOnN1 as Primary replica otherwise goto New Query Step directly.
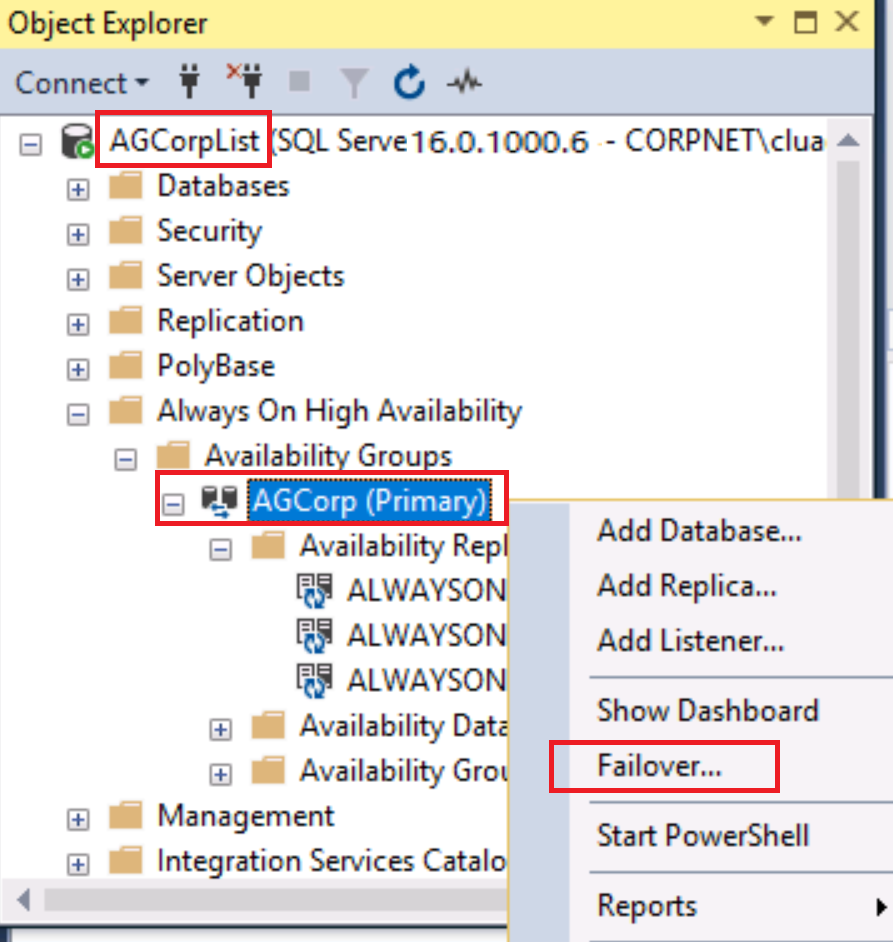
Right click AGCorp (Primary) and select Failover
In the Introduction page, click Next.
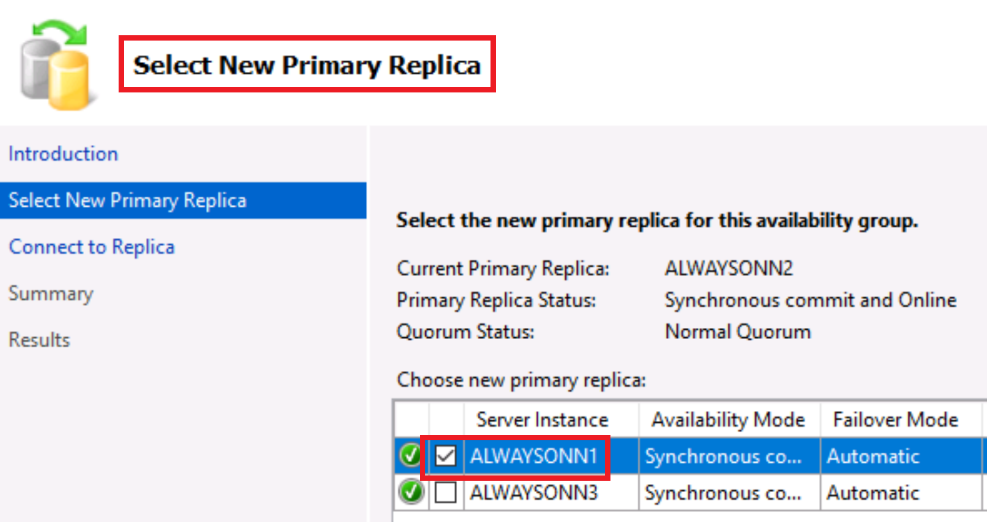
In the Select New Primary Replica page, click ALWAYSONN1 and click Next.
On the Connect to Replica page, click Connect

Click Connect on the pop-up dialog box and click Next.
In the Summary page, click Finish. On successful completion of failover, click Close.
Right click AGCorp (Primary) and select refresh. Ensure that AlwaysOnN1 is the Primary replica as shown below.
Find AGCorpList in the list of instances in the Object Explorer, right click it and select New Query

In the query window that appears, type the following TSQL and press F5 or click the Execute button to execute the script:
Open Notepad in the lab environment VM. Use the Type Text feature to enter the code into Notepad, copy the code, and then paste it into the Query Editor. This will bypass the autocomplete features in the Query Editor.
TSQLALTER AVAILABILITY GROUP [AGCorp] ADD DATABASE [CustomerData]; GO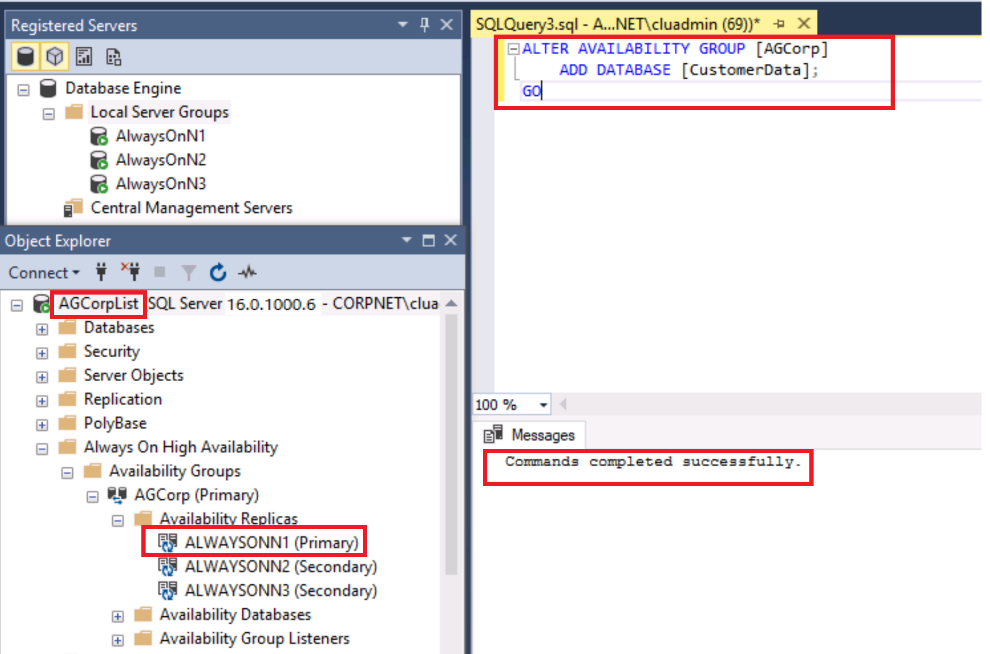
Verify the Messages tab indicated the commands completed successfully.
Now navigate to each of the instances in the Object Explorer, right click the Databases folder and select refresh. You should now see the CustomerData database on all three instances, and it should show (SYNCHRONIZED).
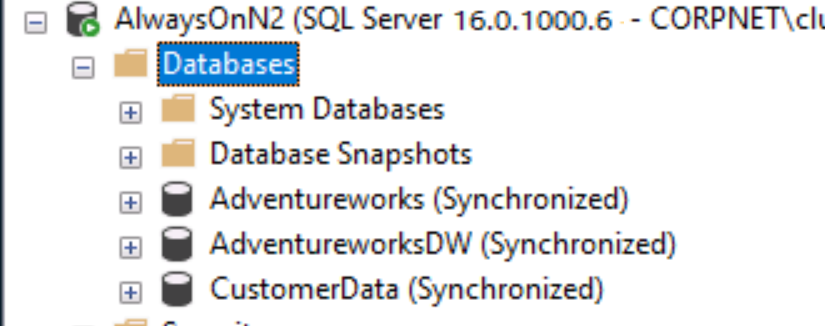
After refreshing the new database shows up on the secondary.
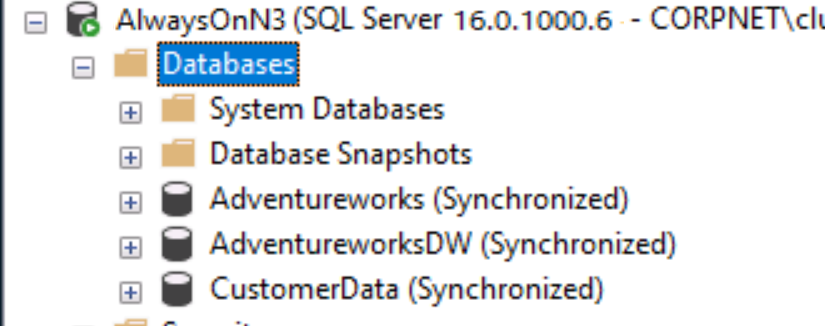
Congratulations!
You have successfully completed this exercise. Click Next to advance to the next exercise.
Exercise 4: Validate the secondary replicas have a copy of the new database
In this exercise, you will learn how to validate the secondary replicas have a copy of the new database
Tasks
At the end of exercise 3, we visually confirmed the [CustomerData] database was now on the secondary replicas. In this exercise we will query some DMVs to show information about the seeding process. These DMVs are useful if there are problems with automatic seeding.
We will connect to the availability group primary to execute these DMV queries. Click on the Connect button in the Object Explorer window as show in the screen caption. Select the Database Engine option.
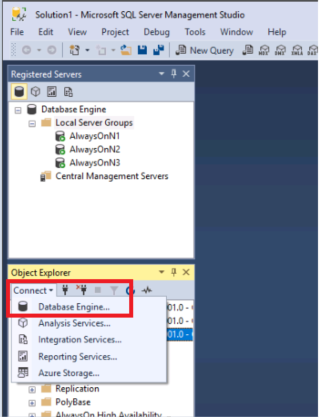
Enter the name of the availability group listener, AGCorpList and press the Connect button.

Find AGCorpList in the list of instances in the Object Explorer, right click it and select New Query
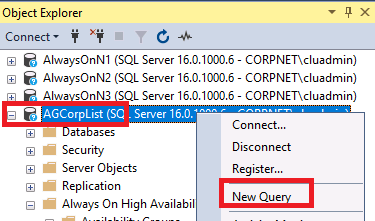
In the query window that appears, type the following TSQL and press F5 or click the Execute button to check the status of the automatic seeding process.
Open Notepad in the lab environment VM. Use the Type Text feature to enter the code into Notepad, copy the code, and then paste it into the Query Editor. This will bypass the autocomplete features in the Query Editor.
TSQLSELECT * FROM sys.dm_hadr_automatic_seeding; GO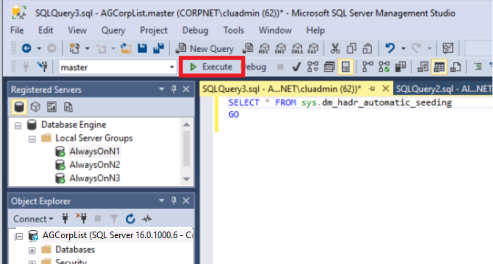
Scroll right and left through the results to look at the various fields of information.
What is the "current_state"?
How many attempts were made for each secondary replica?
In the query window, type the following TSQL and press F5 or click the Execute button to see the physical statistics for each seeding process that is currently running.
Open Notepad in the lab environment VM, use the Type Text feature to enter the code into Notepad, copy the code, and then paste it into the Query Editor. This will bypass the autocomplete features in the Query Editor.
TSQLSELECT * FROM sys.dm_hadr_physical_seeding_stats; GO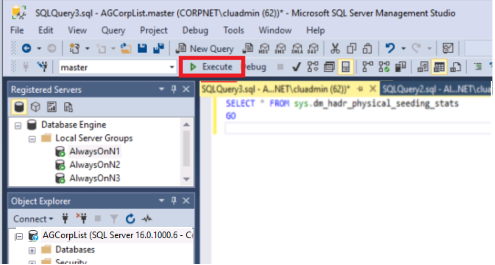
Scroll right and left through the results to look at the various fields of information.
The two columns total_disk_io_wait_time_ms and the total_network_wait_time_ms can be used to determine performance bottleneck in the Automatic seeding process.
total_disk_io_wait_time_ms represents the time spent by the backup/restore thread while waiting on the disk. This value is cumulative since the start of the seeding operation. If the disks are not ready for reading or writing the backup stream, the backup/restore thread transitions into a sleep state and wakes up every one second to check if the disk is ready.
total_network_wait_time_ms is interpreted differently for the Primary and the Secondary replica. At the primary replica this counter represents the network flow control time. On the secondary replica this represents the time the restore thread is waiting for a message to be available for writing to the disk.
The above query only returns rows when seeding is running.
Congratulations!
You have successfully completed this exercise. You can move to the next lab.